

Hace unas semanas el buen tiempo visitó Vigo, no me gusta exagerar, pero parecían días de verano. Así que decidí estrenar mi nuevo bolso marinero tomando algo con mis amigas en un sitio precioso del casco vello de Vigo.
Es un bolso con tipo saca, en el que cabe de todo, si si, de todo, hasta el punto de llevar 5 kg colgando del hombro!
Los materiales me costaron menos de 5€ y tardamos (mi madre y yo) 1 hora en hacerlo, de los cuales, 20 minutos los invertimos en conversaciones del tipo " no, así es mejor" " pues a mi no me gusta" "vas maaaal" " te lo dije", somos un circo haciendo DIY juntas, pero no lo cambiaría por nada del mundo!
A few weeks ago the good weather visited my city, I do not like to exaggerate, but seemed we were in summer!. So I decided to wear my new bucket bag for having a drink with my friends in a beautiful location in the old part of Vigo.
It is a bag like a sack, which fits all, yes , everything, to the point of carry 5 kg hanging from the shoulder!
I expended 5 € in materials, and I made this bag in 1 hour.
It is a bag like a sack, which fits all, yes , everything, to the point of carry 5 kg hanging from the shoulder!
I expended 5 € in materials, and I made this bag in 1 hour.

Materiales: Trozo de plástico, tela, cordel, máquina de coser, tijeras
Materials: Piece of plastic, fabric, rope, sewing machine, scissors

Paso 1: Cortar 2 círculos de 15 cm de diámetro
Step 1: Cut two circles of 15 cm diameter

Paso2: Necesitamos 2 rectángulos de 145 cm de largo x 36 cm de ancho. Yo combiné rayas horizontales y verticales para darle un toque diferente.
(Si queréis un bolso igual pero más pequeño, reducir las medidas de forma proporcional)
Step 2: We need two rectangles of 145 cm long x 36 cm wide. I combined horizontal and vertical stripes to give a different touch.

Paso 3: El forro interior tiene que tener unas medidas de 145 cm largo x 145 cm ancho
Step 3: Inner liner must be 145 cm long x 145 cm wide

Paso 4: Cosemos dos rectángulos. Primero realizamos una costura con forma cuadrada (en lo que será el fondo del bolso) y a continuación cosemos los laterales de los rectángulos, de este modo ya tenemos la forma de saco.
Step 4: Sew two rectangles. First stitch a square (in what will be the bottom of the bag) and then sew the sides of the rectangles, so we have the sac form.

Paso 5: Colocar los círculos de plásticos en el centro del fondo y por encima la tela de forro.
Step 5: Place the circles of plastic in the center of the bottom, and place the inner linning

Paso 6: Coser el forro y la tela de forma circular, dejando los 2 círculos de plástico entre las 2 telas.
Step 6: Sew the liner and fabric with a circular shape, leaving 2 plastic circles between the 2 fabrics.

Paso 7: Cortar la tela de forma que quede igualada, doblar hacia el exterior y coser un canal por el que irá el cordel que cierre el bolso
Step 7: Cut the fabric so that it matched with the liner, bend outwards and sew a channel through where will place the rope for close the bag

Paso 8: Introducir la cuerda por el canal con la ayuda de una aguja de calceta
Step 8: Enter the rope through the channel with the help of a knitting needle
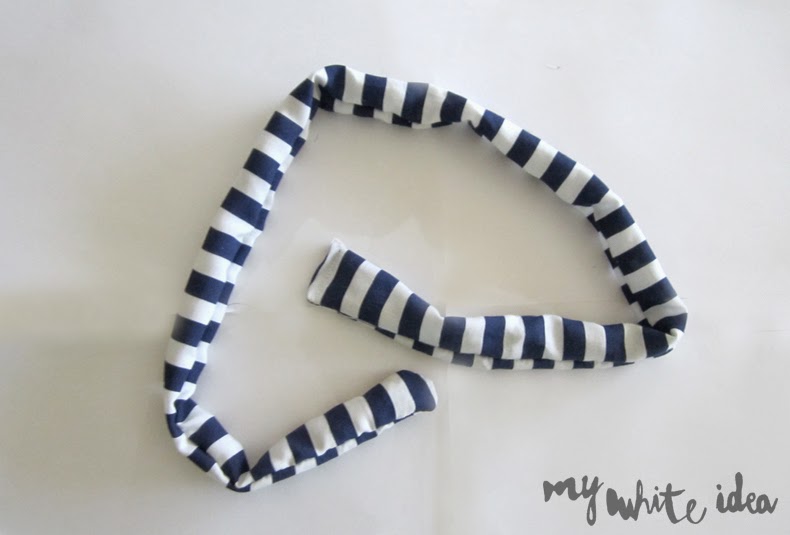
Paso 9: Cortar y coser una tira que será nuestra asa
Step 9: Cut and sew a strip that will be the handle of the bag

Paso 10: Coser el asa al bolso
Step 10: Sew the handle to the bag


Espero que os guste y gracias por los comentarios!
I hope you like it and thanks for the comments!
I hope you like it and thanks for the comments!


Buena idea la de los plásticos!
ResponderEliminarGracias Pepe! un besiño
Eliminar